If you have included the Eurocircuits Assembly service with your PCB order you will need to upload CPL Data (Component Placement List) along with the BOM data.

The CPL data contains information necessary to place the component parts on the PCB and must include the follow information for each individual part:

  • Reference Designator (R1, R2, C3, X4, IC5 etc.).
  • Rotation.
  • Which side of the PCB it is to be mounted on (Top or Bottom).
  • The X/Y coordinate of the component centre on the PCB.
IMPORTANT


  • If you have uploaded your PCB data as a native EAGLE.brd or KiCad file, then we can automatically extract the CPL data from this file and there is no need to upload a separate CPL data file.
  • If no assembly service is required, then then there is no need to upload your CPL data.

CPL Data File Format

The data should be provided as either an Excel/Spread or CSV format.

The first row of the file should be a header which identifies what information is held in each column.

An individual row must be used for each Component Designator thereafter.

Excel/Spread Sheets files

CPL-File-Excel-Format

CSV files

These file formats have either a delimiter such as a comma (,) or a TAB etc to separate the data under each heading.

CPL-File-Comma-Delimited-Format

Comma Delimited CPL File


CPL-File-Tab-Delimited-Format

Tab Delimited CPL File

Uploading your CPL Data

The CPL data can be uploaded with your PCB data or later as required however, it can only be uploaded once the BOM data has been uploaded.

IMPORTANT


  • You will only be able to view your BOM data once you have Signed in to your Eurocircuits account. Therefore, we recommend that you Sign In to your Eurocircuits account before uploading your data.
  • If you do not have a Eurocircuits account, you can create one free of charge here.

Uploading CPL Data with PCB Data

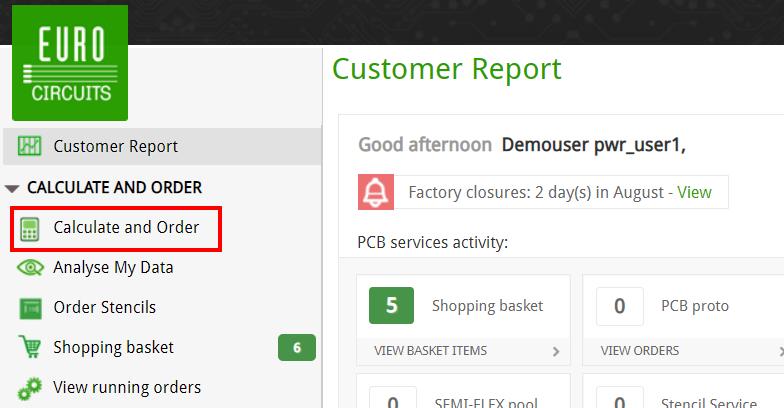
There are 2 methods (Method 1 & 2) either via the Eurocircuits website Home Page or from within the PCB Calculator.

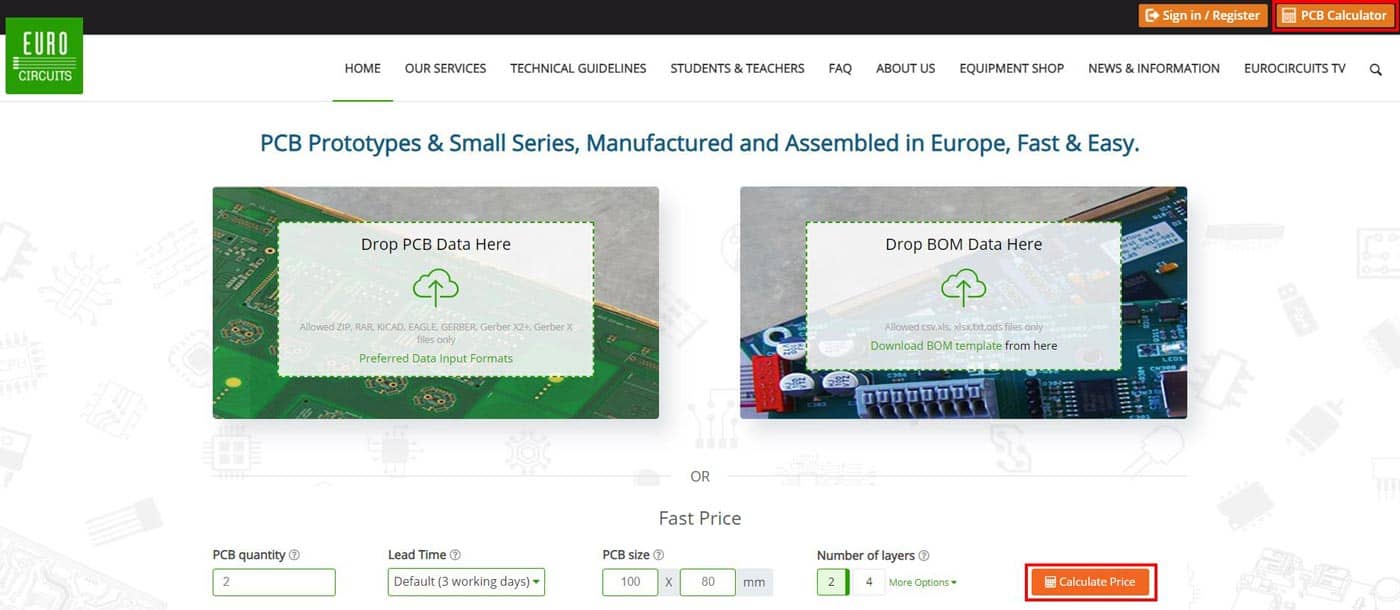
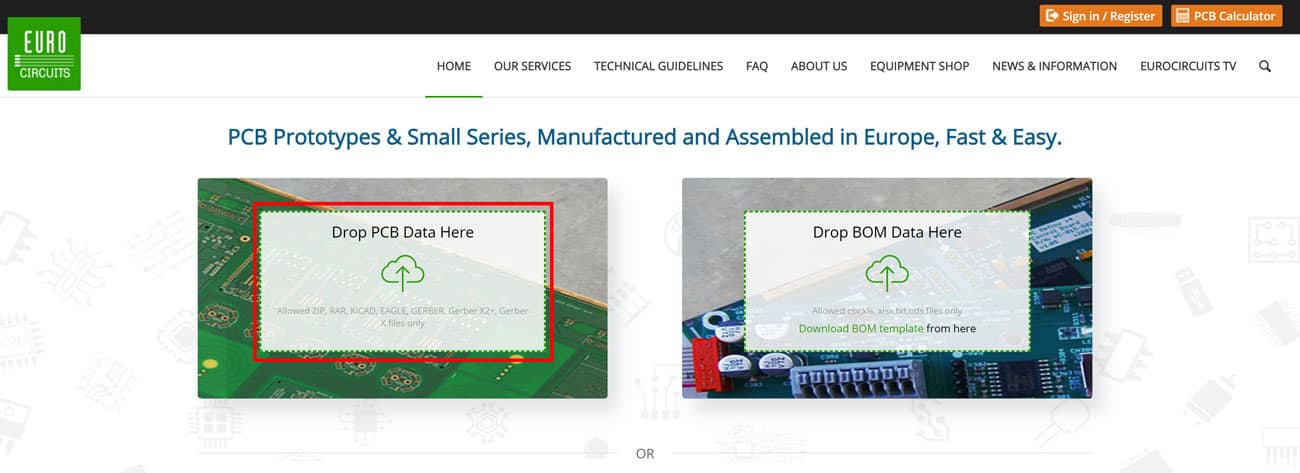
Method 1 – From the Eurocircuits Home Page

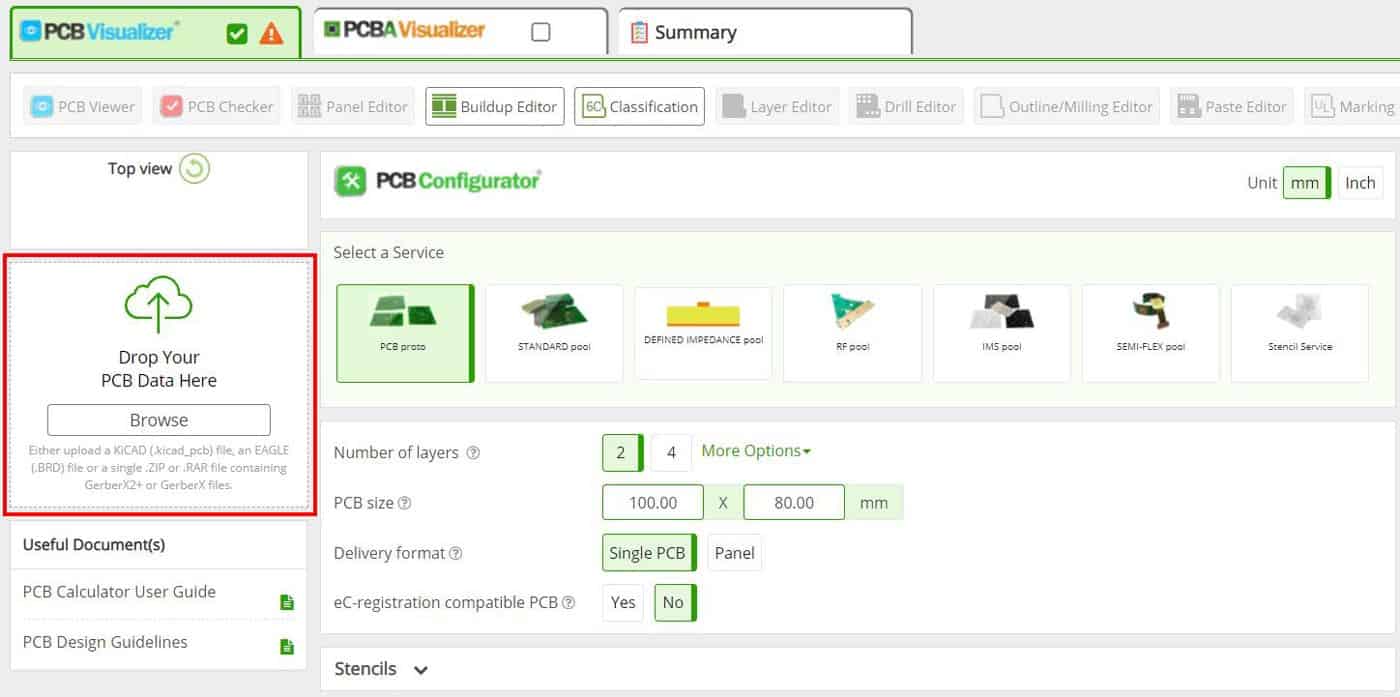
On the Home page simple Drag & Drop your PCB Data file into the Drop PCB Data Here box or left mouse click in the box to browse for the PCB Data file to be uploaded.

Home-Page-Drag-and-Drop

This will then open a pop window where you click on the Upload BOM data orange button (bottom right).

Add-BOM-with-PCB-M1

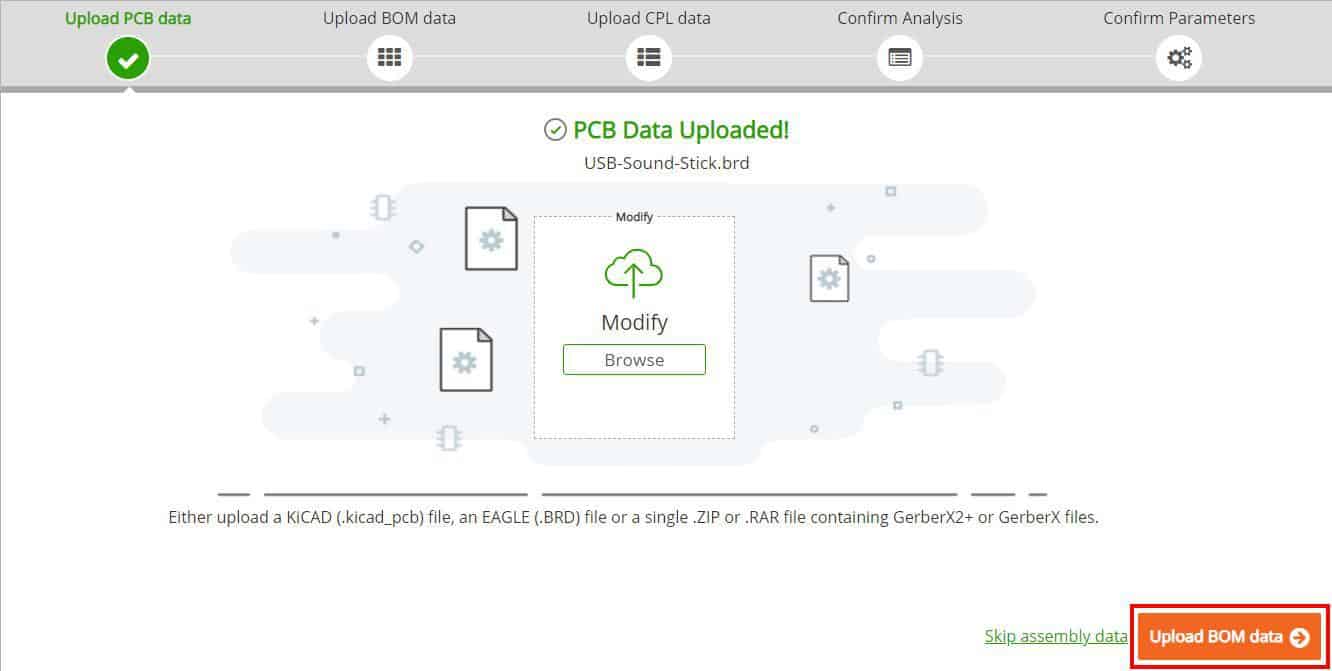
The new window will allow you to Drag & Drop your BOM Data file or browse and select the file.

Upload-BOM-Click-Upload-CPL-Data

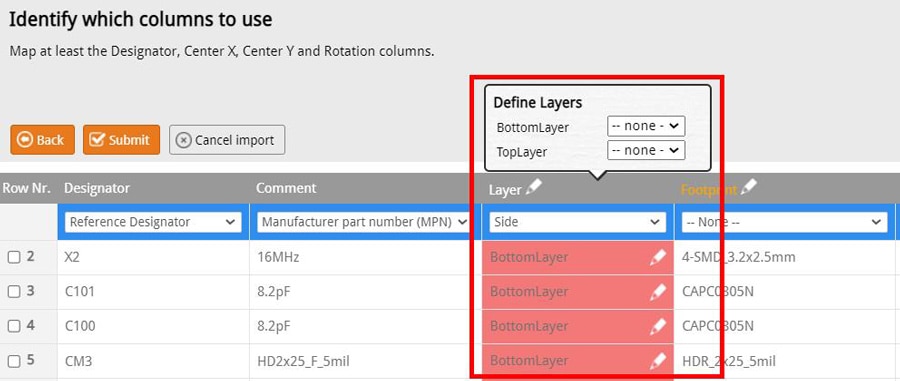
Once the BOM data is uploaded click on the Upload CPL data button. This will open a new window where you can Drag & Drop your CPL Data file or browse and select the file.

NOTE


  • If you have uploaded your PCB data from a native EAGLE.brd or KiCad file, then the CPL data is already included in this data so you can skip the upload of the CPL.


Upload-CPL-data-Confirm-Analysis

Once the CPL data is uploaded the click on the Confirm Analysis button.

The next window allows you to select either Full PCB Analysis or PCB Configurator.
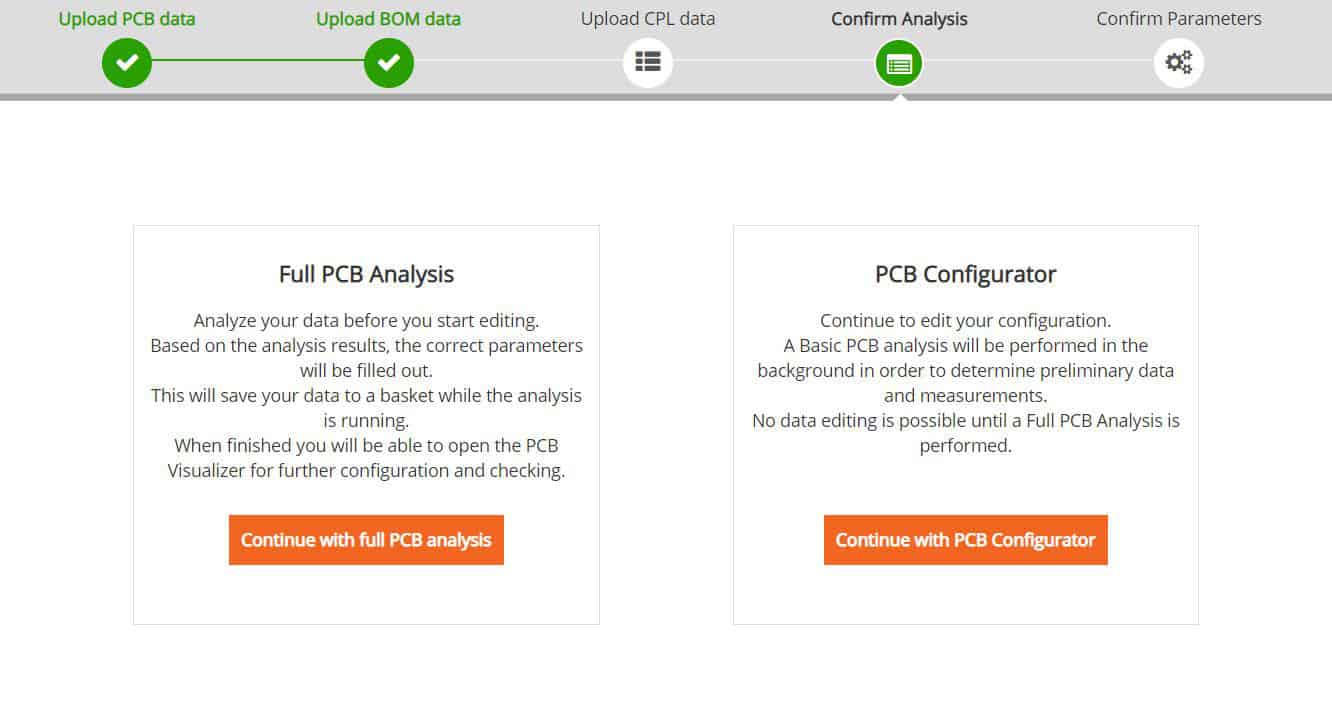
Select-Fast-a-Full-Analysis

Full PCB Analysis

This requires you to be Signed in to your Eurocircuits account and performs a full DRC check of both your PCB, BOM and CPL (if available) data. It may take a few minutes to complete, depending on the complexity of the data.

After this is complete the PCB Configurator will open where you will see the price for the bare boards and for the assembly including components and which components are in stock or need to be ordered (On Demand).

You will also be able review the analysis of the layout and see any potential issues and fix them with the Visualizer smart tools.

PCB Configurator

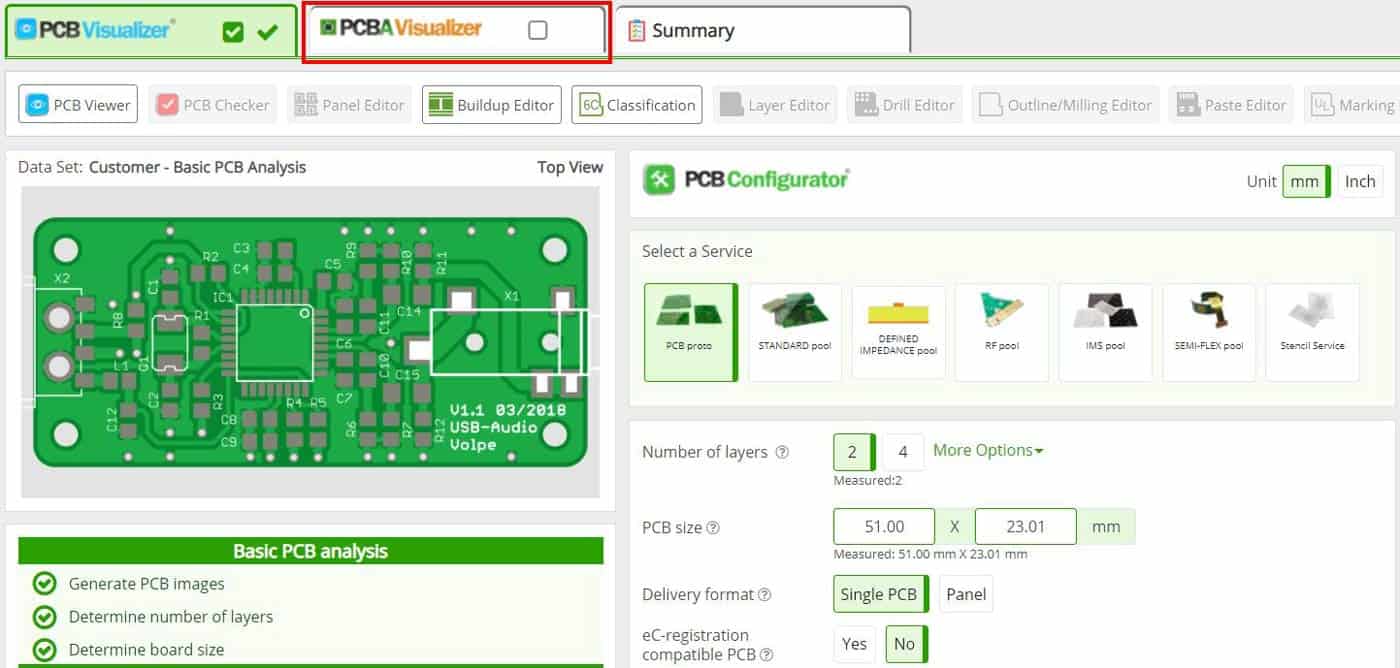
This will open the PCB Configurator and provide a graphical representation of your Data without any DRC check. You can also change and select different manufacturing options for the bare board.

Use this if you need a quick price or to see if your data has been output correctly from your CAD system. To check your BOM data (or CPL data) you will need to Sign in to your Eurocircuits account.

Once you have signed in you can then review your BOM data, check component availability, price and change components if necessary.

Method 2 – In the PCB Calculator

To upload the CPL data in the PCB Calculator you must first open it by either:

  • Clicking on the orange PCB Calculator button at the top right of the Eurocircuits website home page.
  • Clicking on the orange Calculate Price button in the Fast Price section on the Eurocircuits website home page.
  • Selecting Calculate and Order from the menu on the left in your customer account.

Upload-BOM-with-PCB-M2

Home Page PCB Calculator Buttons


Calculate-and-Order

Calculate and Order in Customer Account


Once selected, the PCB Calculator will open, the only difference is that if you are signed into your customer account is that the menu on the left is still visible.

PCB-Calculator-PCB-Drag-and-Drop

Here you can drag & drop your PCB data file into the Drop Your PCB Data Here box or click on the Browse button to select the data file.

Once this is complete, a graphical representation of your Data without any DRC check will be displayed.

Next click on the PCBA Visualizer tab.

PCB-Calculator-PCBA-Tab

Drag & drop your BOM data file into the Drop your BOM here box or click on the Browse button to select the data file.

PCBA-Visualizer-BOM-D-and-D

Once the BOM data has been uploaded you will be able drag & drop your CPL data file into the Drop your CPL here box or click on the Browse button to select the data file.

Upload-CPL-Data-PCBA-Tab

NOTE


  • You will only be able to view or edit your BOM and CPL data once you have Signed in to your Eurocircuits account.

Upload CPL Data to a Saved Shopping Basket Item

First you must Signed in to your Eurocircuits account and select Shopping basket from the left-hand menu.

Selecting-Shopping-Basket

The list of the items in your Shopping basket will be displayed and to upload CPL data or replace existing CPL data to one of these simply click on the item in the Assembly Visualizer column.

Select-Item-in-Assembly-Column

This will open the PCB Visualizer where you can either drag & drop your CPL data file into the Drop your CPL here box or click on the Browse button to select the data file.

Upload-CPL-Data-PCBA-Tab

NOTE


  • You will only be able to upload your CPL data if the BOM data has already been uploaded.

Then select the Proceed to Summary button.

PCBA-Proceed-to-Summary

Now click on the Save changes button to save the CPL data to that PCB in the Shopping basket.

Summary-Save-Changes

Why has the CPL Editor Opened

In the rare event the CPL Editor opens during the upload of the CPL data this means we have ambiguous information in the data.

The CPL editor will open with a warning message and ask you to take the necessary actions and once once complete the data upload will be finalised.

Upload-CPL-Editor-Define-Layers

If you cannot resolve the issue then please contact us via our Online chat service or your local Eurocircuits representative.